




Carpet Pad Cutting: Tips And Techniques For Perfect Fit
Installing a new carpet isn't just about choosing the right material; it's also about getting the padding right. A well-cut carpet pad enhances comfort, extends the life of your carpet, and improves insulation. Through years of experience, I've learned that precision in cutting carpet padding can make or break an installation. If you've ever struggled with uneven padding or ill-fitting sections, don't worry—I've been there. In this guide, I'll share the expert techniques I've honed over the years so you can learn how to cut carpet pads with confidence and achieve a flawless fit.
Why You Need To Cut Carpet Padding
Carpet padding doesn’t come pre-cut to fit your exact room dimensions, so you’ll need to trim it down. Proper cutting ensures the padding lays flat, covers the entire area, and doesn’t create bulges or gaps under the carpet. Whether you’re dealing with wall-to-wall carpeting or just adding a rug pad for extra cushioning, knowing how to cut carpet pads correctly makes all the difference. I’ve seen too many people rush this step and end up with shifting carpet or awkward seams.
Why you need to cut carpet padding
Preparing Tools And Materials For Cutting Carpet Pad
Before diving in, make sure you have all the right tools and materials on hand. Being well-prepared not only makes the process smoother but also helps you avoid unnecessary mistakes that could cost you time and effort.Essential Tools
From my experience, using the right tools can mean the difference between a clean cut and a ragged mess. Here’s what I always keep on hand:- Carpet knife or utility knife: A sharp blade ensures smooth, precise cuts.
- Heavy-duty scissors: Useful for trimming small sections and refining edges.
- Measuring tape: Accurate measurements prevent unnecessary waste.
- Straightedge or T-square: Helps guide straight cuts for a clean finish.
- Marker or chalk: Mark your measurements before cutting.
Materials
- Carpet pad: Choose the appropriate type for your carpet and subfloor.
- Double-sided carpet tape: Helps secure the padding in place.
- Duct tape: Useful for joining seams and reinforcing edges.
- Protective gloves: Your hands' defense against sharp tools.

Prepare tools to cut carpet padding
Step-By-Step Guide To Cutting Carpet Pad
Measure And Mark
Before making any cuts, take precise measurements of your floor area. I always stick to the golden rule: measure twice, cut once. It’s a simple habit, but one that has saved me from costly mistakes more times than I can count. When dealing with irregularly shaped rooms, accuracy is everything. Even a small miscalculation can lead to wasted material or a poor fit, making the installation process more difficult.Once your measurements are set, use chalk or a marker to outline where the cuts will be made. If your room has tricky corners, doorways, or odd angles, creating a paper template first can be a game changer. It allows you to refine the fit before making irreversible cuts. This method helps minimize errors, reduces material waste, and ultimately saves you time and frustration in the long run.
=>>> Related articles: Which side of the carpet pad goes down

Measure and mark carpet padding
Cut The Carpet Pad
Start cutting along the marked lines using a carpet knife or sharp scissors. A sharp blade ensures clean cuts, while a steady hand helps maintain accuracy. If you’re working with thick padding, don’t try to slice through in one go. Instead, make multiple light passes with the knife. This approach gives you better control and reduces the risk of jagged edges.When cutting large sections, I always find it helpful to use a straightedge as a guide. This ensures my cuts stay straight and precise, preventing uneven edges that could affect the final carpet installation. Taking your time during this step will pay off in a smooth, professional-looking result.
Cut Complex Details
Rooms rarely have perfectly straight walls or simple layouts, so you’ll often need to work around doorways, vents, and other obstacles. When handling these tricky areas, I’ve learned that patience is key. Start by cutting slightly inside the marked line rather than right on it. This conservative approach allows for fine-tuning and prevents cutting away too much too soon.Once you’ve made the initial cut, test the fit by placing the carpet pad in position. If it’s too tight, trim small amounts gradually until it fits snugly. Be cautious, as once material is removed, it can’t be put back. Taking your time here ensures a seamless, professional-looking installation.
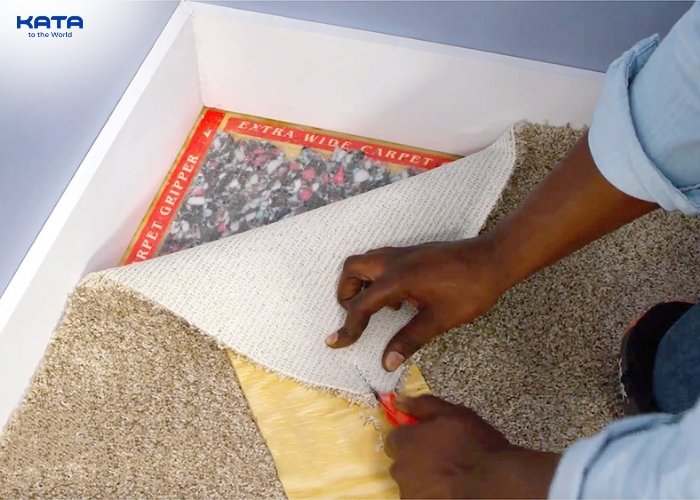
Intricate detail cutting on carpet padding
Check And Adjust
Once all the pieces are cut, carefully lay them in place, ensuring each section aligns perfectly with the room’s dimensions. Check for any gaps or overlaps, as even minor misalignments can impact the carpet’s final appearance. The padding should sit edge-to-edge without bunching up, creating a smooth foundation.If you notice any excess material, trim small sections gradually to achieve a precise fit. Pay special attention to the seams where pieces meet—these should be flush with no noticeable gaps. At this stage, I always use duct tape to secure the seams, reinforcing the padding and preventing any movement during carpet installation. A well-secured carpet pad ensures long-term comfort and durability.
=>>> Related articles: How much is carpet padding
Tips And Precautions For Cutting Carpet Pad
Choose The Right Cutting Tool
I can’t stress enough how important a sharp knife is when cutting carpet padding. A dull blade doesn’t just make the job harder—it can ruin the material by tearing it instead of slicing it cleanly. This leads to uneven edges that make the installation process frustrating and time-consuming. If you notice that your knife isn’t gliding through the padding smoothly, don’t hesitate to replace the blade. A fresh, sharp edge will give you the clean cuts needed for a precise fit and a professional-looking result.
Choose the right cutting tool
Cut Layer By Layer
For thick padding, cutting through the entire depth at once can be tricky and lead to rough edges. Instead, use a carpet knife to make shallow, controlled cuts along your marked lines. Apply steady pressure, gradually deepening each pass until you slice through cleanly. This method ensures precision and reduces hand strain, making the process easier and more efficient. By working in layers, you achieve a smooth finish that provides the perfect foundation for your carpet.Be Careful With Corners And Edges
Corners can be tricky, and overcutting is a common mistake that can lead to visible gaps. I always leave a bit of extra material when cutting around corners, ensuring I have room to make precise adjustments. Instead of cutting too much at once, I trim gradually until the fit is just right. This careful approach prevents errors and ensures the carpet pad sits perfectly in place.=>>> Related articles: Which Carpet Type is Right for You

Be careful with corners and edges of carpet pad
Use Tape
Using double-sided carpet tape or duct tape secures the padding and prevents shifting, which is crucial for maintaining a stable foundation. I always make sure to tape along the seams and edges, ensuring the padding stays in place. This creates a smooth, even base that prevents wrinkles and bunching once the carpet is installed, helping to maintain its appearance and longevity.Final Thoughts
Cutting carpet padding isn’t complicated, but it does require patience and precision. Over the years, I’ve found that the little details—sharp tools, careful measurements, and secure seams—make all the difference in achieving a professional finish. If you’re tackling a DIY carpet installation, following these steps will help you get the best results. Now that you know how to cut carpet pads like an expert, you’re ready for the next step: laying down that beautiful new carpet!
Other articles



COPYRIGHT 2021 © ALL RIGHT RESERVED KATAVINA


[×]
REGISTER AGENT
We will contact you as soon as possible